RecyclerView is a ViewGroup ideal for displaying dynamic data. An example of such dynamic data is a list of weather forecasts for multiple days. Each item on the list can have properties like the date, temperature, and city for the forecast.
With the help of RecyclerView, it is possible to render data by reusing views from items that are no longer visible on the screen. This behavior saves memory and improves the speed and performance of an app. As a result, RecylcerView is the preferred tool for displaying large amounts of data in a list.
In this post, you’ll learn about RecyclerView and how to use it in a Kotlin app. First, let’s take a closer look at what RecyclerView is and how it works.

What Is RecyclerView?
RecyclerView is part of the Jetpack family of libraries. Its job is to display a large set of data. For example, a RecyclerView can implement the newsfeed feature on a social media app.
The RecyclerView uses a layout to define the look of each item in a list. From our initial weather data example, this layout might contain views for displaying details like the temperature, the city, and the date.
To explain how the RecyclerView works better, here are some sample weather data:
The data above is in JSON format and provided only for demonstration.
Notice that each object in the data has three properties, or fields. The properties are date, city and temperature. Therefore, if we wish to display all the fields in a RecyclerView, our single item layout might look like this:
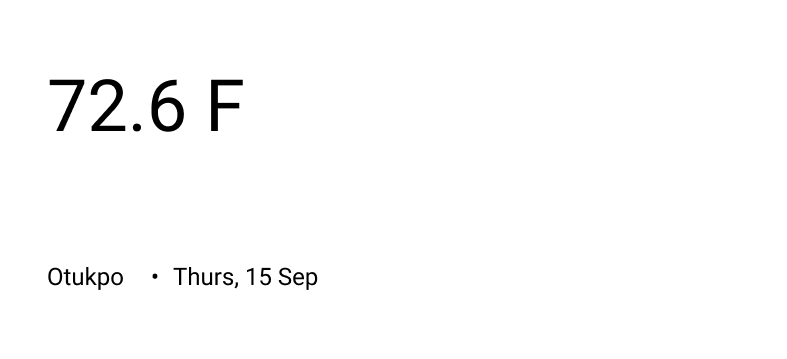
For example, the item view rendered for our first item will look like this:

RecyclerView Adapter
The RecyclerView adapter binds data to the item view we just discussed. It works together with another class (the ViewHolder) to display data. The adapter has three main methods that you need to override in order to set up a RecyclerView.

One is the onCreateViewHolder() method. This method creates a new ViewHolder that initializes the item View. However, it doesn’t handle the actual process of binding data to the views.
Another method is the onBindViewHolder(); it’s key job is to get the data to be displayed and bind them to the view holder’s layout. For instance, in our weather data example, this method sets the value for temperature, date, and city to the associated TextView.
The last method is the getItemCount(). Just as the name implies, this method can return the size of the data set. For example, in our sample weather data it returns the total number of weather readings. The number for the sample data is five (5). This method helps the RecyclerView determine when there’s no further data to display.
We now understand how RecyclerView works under the hood. In the next section, we’ll walk through the process of adding a RecyclerView to an app.
How to Use a RecyclerView
Here we will detail the steps to build an actual app with our sample weather data to demonstrate the process of using Kotlin RecyclerView.
Note: In this tutorial, we assume you already know how to create a new Android Studio project. If you need help with this, check out the guide from the official documentation.
To follow along, create a new Kotlin project with default settings. Now let’s dive into the steps.
1. Add RecyclerView Library to Project
You may need to add the RecyclerView library to your project if it’s not already included. To do that, in Android Studio open the app-level build.gradle file and add the following code on a new line under the dependency section:
After that, click the Sync Now button so that Gradle can sync and download the necessary files for the dependency.
Note: If your app has “com.google.android.material:material” in the dependencies section, you can skip this step because that library already adds RecyclerView to the project.
2. Add RecyclerView to Layout
The RecyclerView also includes a View that we’ll add to the layout file for our MainActivity. Navigate to activity_main.xml (located in Project/app/src/main/res/layout) and add the following code inside the parent ConstraintLayout:
3. Create Layout For Single Item View
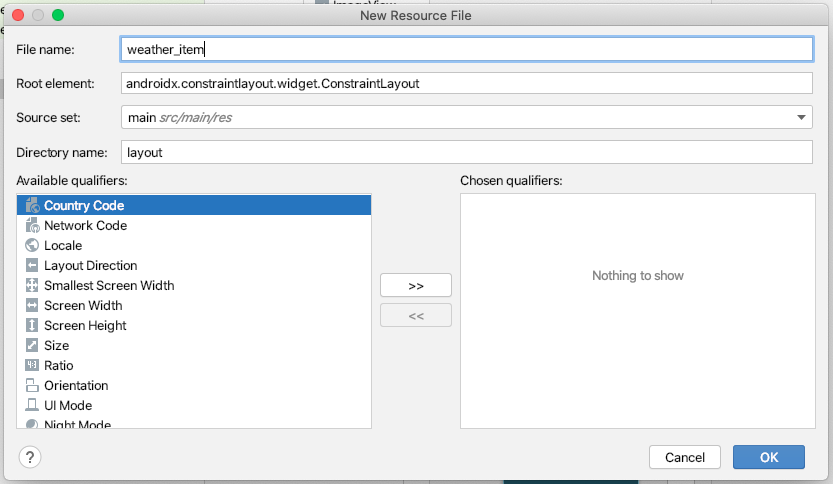
Earlier, we mentioned that RecyclerView uses a layout file to define how each data item will look. In this step, we’ll create that layout file. In Android Studio, right-click on the layout directory then select New -> Layout Resource File.

Enter weather_item in the File name field and leave other fields unchanged. Click the Ok button to create the new layout.

Next, let’s design how we want each item in our RecyclerView to look. Add three TextViews inside the parent layout of weather_item.xml. Align the first TextView in the top row, then the second and third side-by-side on another row. Also, set the ID attributes for the first, second, and third TextView to temperature_tv, city_tv, and date_tv respectively.
Finally, change the height attribute for the parent ConstraintLayout in weather_item.xml to wrap_content. Doing so prevents a single item from occupying the entire vertical space on the screen.
Here’s the final code for our weather_item.xml file:
4. Implement ViewHolder Class
We’ll be using the same Kotlin file for the Adapter and the ViewHolder classes. And, we’ll be naming the file WeatherAdapter.kt. Right-click on the main package name for your project, then navigate to New -> Kotlin File/Class.

Enter WeatherAdapter as the class name and hit the Enter/Return key.
Once the file is created, open it and replace the content with the following code:
If you get a “Class ‘WeatherAdapter’ is not abstract and does not implement abstract base class member…” error after adding the above code, no need to panic. We’ll eliminate this error in the next step.
5. Implement RecyclerView Adapter
Here, we implement the three main methods of the adapter.
In order to implement the onCreateViewHolder() method, add the following code inside the WeatherAdapter class:
That code inflates our weather item layout into a view and returns a ViewHolder with that view.
Next, implement the onBindViewHolder() method. To do this, add the following code to the WeatherAdapter class:
Now, add the following code for the getItemCount() method:
At this point, we’ve completed the setup for our WeatherAdapter and we can proceed with using it to display data in our app.
6. Use Kotlin RecylerView in MainActivity
Open the MainActivity.kt file and add the following code inside the onCreate() method:
This code creates a new instance of the WeatherAdapter. It also sets a LayoutManger for the RecyclerView. We’re using the LinearLayoutManager, which offers a vertically scrollable list. And the last line connects our adapter to the RecyclerView from activity_main.xml.
7. Test the App
Launch the Android emulator or connect a physical device, then click the green play button in Android Studio to run the app. Once the build process completes you should see the weather data displaying in a list.
In addition, you can run automated UI testing for RecyclerView using the Espresso test library. However, this involves writing specific test codes that can perform actions like scrolling a list. The test can also check for a particular item on the list or whether the list is empty.
Another simple way to test your Android apps is to use Waldo. Waldo offers a no-code testing solution for mobile developers. You can try Waldo for free here.
To Sum up
In this post, we walked through how to use Kotlin RecyclerView in an app. We also discussed why RecyclerView is the best solution for displaying large amounts of data. You can find the complete source code for our example app here. To continue learning about this very helpful library, you can check out more examples on the Kotlin RecyclerView GitHub repo.
Automated E2E tests for your mobile app
Get true E2E testing in minutes, not months.


